Building a functional wood pellet machine requires creating a high-pressure environment where loose biomass is forced through a metal die to form dense fuel cylinders. The process relies entirely on friction and pressure to heat the lignin naturally found in wood to approximately 80°C to 100°C. At this temperature, lignin creates a natural glue that binds the sawdust together without external adhesives. To achieve this at home or in an industrial setting, you must construct a transmission system capable of delivering high torque at low speeds, coupled with a die and roller assembly made from hardened alloy steel. The crucial factor is not just the power of the motor but the compression ratio of the die, which must match the specific density of your raw material. If the compression ratio is incorrect, the machine will produce loose dust or burn the wood instead of forming pellets.
Understanding the Engineering Anatomy of a Pellet Mill
Before cutting metal or welding frames, you must understand the interplay between the drive system and the pelletizing chamber. A pellet machine is not simply a grinder. It is a densification unit.
The Transmission System
The heart of the machine is the transmission. You cannot connect a motor directly to the pelletizing shaft because the speed is too high and the torque is too low.
For a flat die pellet mill, you need a gearbox or a reduction drive. A standard 1450 RPM motor must be reduced to a shaft speed of roughly 100 to 200 RPM. This reduction multiplies the torque. High torque is mandatory to force the rollers over the raw material and push it through the die holes. Many DIY enthusiasts utilize a rear differential from a scrapped truck or car. This acts as a robust 90-degree gearbox that can handle significant stress.
The Pelletizing Chamber
This area contains the die (a flat metal plate with holes) and the rollers. The rollers sit on top of the die. When the central shaft spins, the rollers rotate around the die face. The friction between the roller and the die captures the raw material. The geometry here is critical. The gap between the roller and the die must be adjustable, typically ranging from 0.1mm to 0.3mm. A gap larger than this prevents pressure buildup. A gap smaller than this causes metal-on-metal wear.
Die Material and Metallurgy
You cannot use mild steel for the die. The abrasive nature of sawdust combined with high heat will destroy mild steel in hours.
Lanson uses 20CrMnTi or 40Cr alloy steel for dies, which are then processed through vacuum heat treatment. For a home build, you should source high-carbon steel. The drilling of thousands of holes requires precision. The holes must be countersunk on the entry side to funnel material in. The interior of the hole requires a mirror finish to reduce resistance.
The Critical Importance of Compression Ratio (CR)
Most homemade pellet machines fail because the builder ignores the Compression Ratio. The CR is the relationship between the effective length of the hole in the die and the diameter of the hole.
Formula:

If you want to make 6mm pellets and your wood is softwood (like pine), you might need a CR of 1:5. This means the hole thickness should be 30mm. Hardwoods like oak require a higher compression ratio, often around 1:6 or 1:7, to generate enough heat to activate the lignin.
Calculating the Correct Ratio
If the die is too thin, the wood passes through too quickly. It will not heat up. The result is loose pile of dust.
If the die is too thick, the resistance is too high. The wood will burn inside the hole and block the machine. This is called “plugging.”
Industrial manufacturers like Lanson customize the CR based on the client’s specific raw material. For a DIY build, you generally have to guess or trial multiple dies, which is expensive and time-consuming.
Step-by-Step Construction Process
This section outlines the fabrication of a flat die pellet mill using accessible parts.
Step 1: Frame and Base Fabrication
Stability is paramount. The vibration generated during pelletization is intense.
-
Use heavy-duty C-channel steel for the base frame.
-
Ensure the mounting points for the motor and the gearbox are perfectly leveled.
-
Any misalignment here will cause the coupling to shatter under load.
-
Weld all joints fully. Tack welds will snap during operation.
Step 2: Modifying the Rear Differential
If using a car differential:
-
Lock the differential gears. You want the input shaft to turn the axles directly without differential action.
-
Mount the differential vertically. The input shaft connects to your motor (via pulleys). One axle points up to drive the pelletizing assembly. The other axle must be cut or capped.
-
Seal the housing to prevent oil leaks in this vertical orientation.
Step 3: Fabricating the Roller Assembly
The roller shell needs grooves to grip the biomass. Smooth rollers will slip over the sawdust.
-
Machine slots or dimples into the roller surface.
-
Install heavy-duty tapered roller bearings inside the roller shells. These bearings handle both radial and axial loads.
-
The shaft holding the rollers must remain stationary (in some designs) or rotate (in others). In a standard DIY flat die design, the die is usually stationary while the rollers rotate.
Step 4: The Hopper and Cutter
-
Fabricate a funnel-shaped hopper from sheet metal. It must feed material directly to the center of the die.
-
Install a “slicer” or cutter knife underneath the die. When the pellets extrude, they hang down. The spinning knife cuts them to the desired length. Without a knife, the pellets become too long and break irregularly.
Raw Material Preparation: The Hidden Variable
You can build a perfect machine mechanically yet still fail to make pellets. The chemistry of the wood is the variable.
Moisture Content Control
Biomass must contain moisture between 12% and 15%.
-
Below 10%: The material is too dry. It creates excessive friction and blocks the die.
-
Above 18%: The material is too wet. The moisture turns to steam inside the die hole. This steam expands and “pops” the pellet apart when it exits the die.
Particle Size Consistency
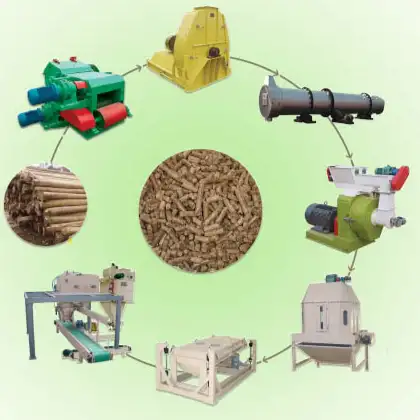
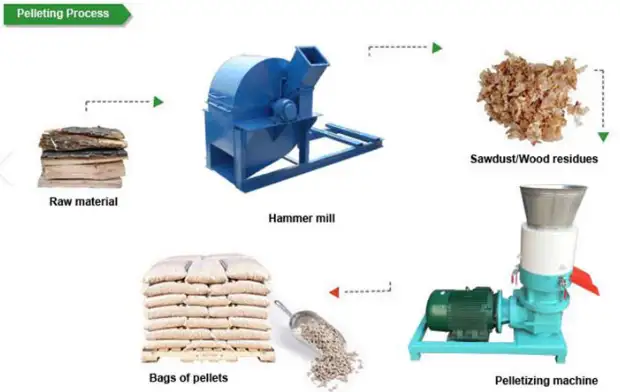
The sawdust entering the machine must be smaller than the diameter of the pellet you intend to make. If you are making a 6mm pellet, the sawdust particles should be 5mm or smaller. Large chips disrupt the compression zone. You need a hammer mill to crush the wood before pelletizing.
Comparison: DIY Build vs. Lanson Professional Machines
It is vital to recognize the difference between a garage project and a production asset.
Table 1: DIY vs. Lanson Industrial Standards
| Feature | DIY / Homemade Rig | Lanson Professional Series |
| Die Material | Mild Steel or Scrap Plate | Alloy Steel (20CrMnTi) + Vacuum Heat Treatment |
| Tolerances | +/- 1.0mm (Hand measured) | +/- 0.02mm (CNC Machined) |
| Motor Life | Dependent on used parts | Industrial Grade Siemens/WEG motors |
| Lubrication | Manual Grease Gun | Automatic Oil Circulation System |
| Output | 10–50 kg/hour (Inconsistent) | 500kg–20 Tons/hour (Continuous) |
| Safety | Minimal | Overload Protection & Emergency Stops |
Lanson machines utilize a vertical ring die design in our advanced models. This allows gravity to feed the material evenly. DIY machines are almost exclusively flat die types because ring dies are impossible to fabricate without a 5-axis CNC center.
Case Study: Upgrading from DIY to Industrial
Client Profile: GreenEco Biomass Ltd.
Location: Oregon, USA
Timeframe: February 2023 – August 2023
The Challenge:
The founder of GreenEco attempted to scale production using a bank of four homemade pellet mills. These units were built using truck differentials and welded frames. By February 2023, the maintenance costs were crippling. The machines required bearing replacements every 40 hours of operation. Furthermore, the pellet density varied significantly. Customers complained that the pellets crumbled during transport.
The Lanson Solution:
GreenEco contacted Lanson in March 2023. We analyzed their raw material, which was a mix of Douglas Fir and Red Cedar sawdust. The high resin content of the softwood required a specific compression ratio that the homemade dies could not maintain.
We installed a single Lanson L-508 Ring Die Pellet Mill. This unit replaced all four DIY machines.
The Results (August 2023 Data):
-
Output: Increased from 300kg/hr (combined DIY) to 1.5 tons/hr.
-
Energy: Electricity consumption dropped by 35% per ton of pellets produced.
-
Labor: Reduced from two full-time operators watching the machines to one part-time supervisor.
-
Quality: Pellet Durability Index (PDI) rose from 88% to 97.5%.
This case demonstrates that while understanding how to make a wood pellet machine is educational, commercial viability requires industrial precision.
Material Compatibility and Ratios
Different woods require different die specifications. The following table provides data for selecting the right setup.
Table 2: Biomass Compression Guidelines
| Raw Material | Hardness | Recommended Compression Ratio | Notes |
| Pine / Spruce | Soft | 1:5 – 1:5.5 | High lignin content makes binding easier. |
| Oak / Beech | Hard | 1:6 – 1:7 | Requires higher pressure to bond. |
| Straw / Grass | Very Soft | 1:8 – 1:9 | Often needs a binder (oil or starch) added. |
| Bamboo | Very Hard | 1:6.5 | Extremely abrasive on the die. |
Troubleshooting Common Fabrication Issues
When you build your own machine, you become the repair technician. Here are the most frequent failures and their solutions.
Table 3: Troubleshooting Guide
| Symptom | Probable Cause | Corrective Action |
| No pellets coming out | Die is plugged or new die is not broken in. | Drill out the holes. Polish the holes with a mixture of oil, sand, and sawdust. |
| Pellets are crumbly | Moisture content is too low or pressure is insufficient. | Add water to the mixture. Check the gap between roller and die. |
| Pellets are puffy/cracked | Moisture content is too high. | Dry the raw material. Reduce moisture to below 15%. |
| Machine vibrates violently | Bearings are worn or assembly is unbalanced. | Balance the main shaft. Check the base frame welds. |
| Motor stalls | Load is too high or blockage. | Reduce feed rate. Check if metal debris entered the chamber. |
The Role of Heat Treatment in Die Longevity
One process you cannot replicate easily in a home garage is heat treatment.
When Lanson manufactures a die, we machine it while the steel is “soft.” Once the thousands of holes are drilled, the die enters a furnace. It is heated to extreme temperatures and then quenched. This changes the molecular structure of the steel, making it incredibly hard.
A DIY die made from standard steel will wear out the holes within days. The holes will become oval-shaped. This loss of geometry destroys the compression ratio. The machine will stop making pellets and start making dust. If you are building a machine, buying a pre-made, heat-treated die and roller set from a supplier is often smarter than trying to drill one yourself.
Safety Considerations
Pellet machines are dangerous. They involve heavy spinning weights and high torque.
-
Shear Pins: Incorporate a shear pin in your drive line. If a bolt or stone falls into the die, the machine will jam. Without a shear pin, the torque will twist your main shaft or burn out your motor. The pin snaps to save the machine.
-
Heat: The die head reaches temperatures over 90°C. Do not touch it during operation.
-
Dust: Wood dust is explosive. Ensure your workspace has adequate ventilation.
Conclusion and Future Steps
Constructing a wood pellet machine is a complex engineering challenge involving metallurgy, transmission mechanics, and thermodynamics. While a DIY approach is possible for small-scale hobbyists, the limitations in tolerance and material hardness often restrict output and longevity. For businesses looking to produce fuel for sale or large-scale heating, relying on professional machinery guarantees consistency.
Lanson specializes in turning biomass waste into value. We understand the nuances of compression ratios and drive durability.
Would you like our engineering team to calculate the exact compression ratio needed for your specific raw material? Contact us today for a free material analysis.
Frequently Asked Questions (FAQs)
1. Can I use a washing machine motor for a pellet mill?
No. Washing machine motors generally lack the torque required for pelletization. They are designed for high speed and low resistance. A pellet mill needs a high-torque industrial motor, typically 3-phase, ranging from 5HP to 50HP depending on the size.
2. Do I need to add glue or binders to the wood?
Generally, no. Wood contains lignin. When compressed and heated, lignin becomes fluid and acts like a natural glue. However, for materials with low lignin (like straw or old, dry wood), adding a small amount of vegetable oil or starch can help the process.
3. How long does a homemade die last?
If made from mild steel without heat treatment, a die might last 10 to 50 hours of operation. A professional heat-treated alloy steel die from Lanson can last 800 to 2000 hours depending on the raw material abrasiveness.
4. Why are my pellets falling apart?
This is usually a moisture issue. If the wood is too dry, it won’t bond. If the compression ratio of your die is too low for the wood species, sufficient pressure is not generated to activate the lignin.
5. What is the best RPM for a flat die pellet machine?
The die or roller rotation speed should typically be between 100 RPM and 300 RPM. Speeds higher than this generate excessive centrifugal force and heat, which can burn the pellets before they form.
6. Can I pelletize wet wood chips?
No. You must dry the wood chips first. The moisture content must be below 15%. Wet wood will create steam pressure inside the die, causing the pellets to explode into loose material upon exit.
7. How much does it cost to build a DIY pellet machine?
If you scavenge parts (scrap metal, used car differential, second-hand motor), you might build one for $500 to $1000. However, buying new components, especially the die and rollers, will push the cost over $2000, at which point buying a small entry-level machine becomes more viable.
8. What is the difference between flat die and ring die?
A flat die machine presses material vertically through a horizontal plate. It is simpler and good for small-scale use. A ring die machine spins a vertical ring, and rollers press material outward. Ring die machines (like Lanson industrial models) are more energy-efficient and durable for high-volume commercial production.
9. How do I break in a new die?
A new die has rough microscopic scratches inside the holes. You must run a mixture of oil, fine sand, and sawdust through the machine for 30–60 minutes. This polishes the holes. If you skip this, the machine will likely jam immediately.
10. Can I mix different types of wood?
Yes, but you must be careful. Mixing hard oak with soft pine changes the average density. You should mix them thoroughly before the hammer mill stage to ensure a consistent blend enters the pellet mill. Inconsistent mixtures lead to uneven pellet lengths and surging motor loads.